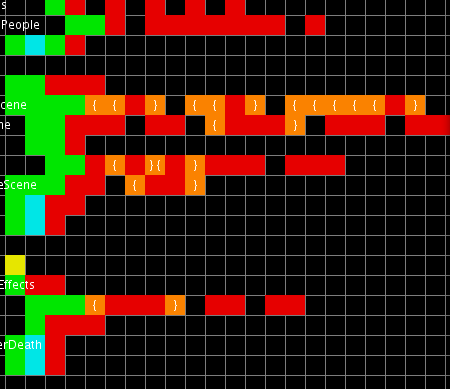
During the development of Westerado we figured out we needed some way to have basic scripting capabilities inside of specific areas in the game. The basic idea was to have some amount of control over where NPCs would move and how they would respond to the player doing certain things. At the time we were using the Ogmo level editor, which was fine for placing object, but didn’t really support anything like that out of the box. Having some experience with the Warcraft 3 editor, which actually used descriptive sentences to make things happen, I decided I could create a scripting system out of placeable blocks that could have direct impact on the game. This system eventually turned into a standalone tool called BloXcrypt.
This system was created after Gunversationist and I really liked the way that was based on reading colors from left to right and didn’t overload you with information constantly, so I decided to do something similar. Different colored blocks would represent parts of a script and would be executed from left to right. These blocks would be in a 2D grid, where every row would be a single function, called a trigger.
There originally were 3 types of blocks: red, green and blue. Red was used for “actions”, which was the actual impact it had on the game. This could be anything from adding 2 variables together to making a character attack something or even calling another trigger by name. Green was used for static “properties” of the trigger itself. Things like giving a function a name, requirements for it to execute and it could also be used to intially disable it to make it available later on. Blue was used for “conditions”. Conditions are reason a trigger would try to execute, which could happen for a number of reasons like when the player enters an area of the level, when a certain character dies or just when a variable has a certain value.
At first we didn’t really know what we could do with this beyond very simple interactions, but this system is used for every non-player action that takes place in both versions of Westerado. The entire tutorial, the puzzles and every scripted part of any quest.
The most useful thing about BloXcrypt after Ogmo was a new targeting feature. Any actions that impacted specific characters or had to add/remove certaing objects had to know what these objects were. In the original system this was handled through singular keywords and assigned groups. Keywords could be used to pick objects of a certain type or in a certain predefined area of the map and using an action you could assign them to a certain group. This group could then be used as a keyword, which you could combine with another action to target just a specific part of that group, for example you could only target objects of the Man class. This was a very annoying process, usually requiring 4-6 action blocks to actually get to the thing you were looking for, creating a bunch of useless groupings in between.
This led to the new targeting system, which combined all of that into a single text field. Allowing the designer to string together multiple properties to filter down to just the targets he wants. Another thing it could do that the old system couldn’t is differentiate between objects in the world that used a specific asset.
Here are a few examples with a short explanation:
NPC,!PianoPlayer,!SaloonOwner,!Allies,Alive
This filter was used to target all Non-player characters in a room that were NOT the PianoPlayer, NOT the SalloonOwner, NOT an ally and who were still Alive.
Man+Woman,!Sheriff,!Player,money=5
This first selects all objects that are either Man or Woman, then it removes any Sheriffs and Players. From that group it selects all characters that would drop 5 dollars when killed, since any variables on the characters is also accessible.
$*tree*,$*green*
This is a fun one, all assets in Westerado are named according to a system. The trees all have tree and the color of the leaves in the name. The $-sign signifies it’s looking for that asset and the * is a wildcard. So this would select all the green trees.
Mother,@AtDoor
This is an example of a predefined area. In Mapographer you can create named rectangular areas, which you can call on through the @-symbol. So this would select any Mother that in the AtDoor area.
Just like Gunversationist this system was always expanding, eventually leading to 2 new colors. Orange was used for additional structuring within a function, which was done through if-else constructions, 2D switches, label and goto blocks and breaks. Yellow was used for imports, so you could use more complex scripts in multiple places without having to redo them for each level and allowing for the scripts to look a lot more clean by splitting them up.
